Appearance
No-code guide
The no-code guide will take you through the following steps to successfully create users and gift cards:
- Get to know your Dashboard – Learn how to log into the Dashboard and discover the interface.
- Create card restriction groups – Predefine your restriction groups to save time during the card creation process.
- Create physical cards in bulk – Create several cards at once while automatically generating users.
- Update the user declarative data – Define your users with the required information.
- Activate and manage cards – Make the final changes to the card for the end user to use.
- Handle the end of life cycle – Make sure your destroy the card and delete the user once the funds are used.

Information – Some features are unavailable
The no-code guide may propose fewer options as some features are not available in the Dashboard. Workarounds are available in the API guide (coming soon).
Get to know your Dashboard
The no-code guide relies on Treezor's Dashboard, a user interface allowing you to interact with the Treezor API without relying on developer tools.
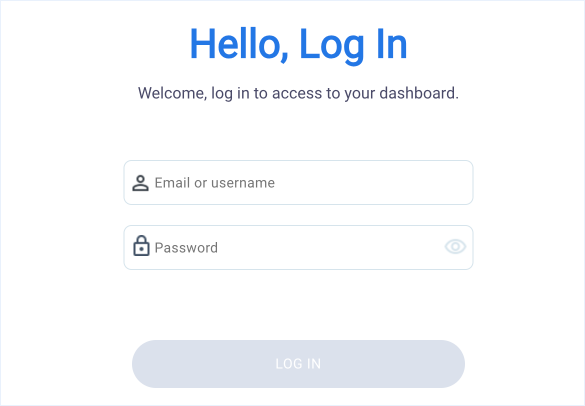
Log into your Dashboard
Treezor provided you with the URL to log into your Dashboard. For your Sandbox, the URL is built as follows:
https://dashboard-{yourCompanyName}.sandbox.treezor.co
Upon entering this URL, you'll be redirected to the sign-in page, which is different depending on whether you've opted for standard login with 2FA or Company SSO login.
Below is an example of Treezor's default login page.
Discover the Dashboard interface
Before you start, let’s take a quick guided tour of the key components of the Dashboard interface.

Note – Your Dashboard is customizable
The views may differ from the screenshots displayed depending on:
- Where you’re at in your integration process, if you’re customizing the design
- The User Role of the logged-in user, if you’re not using all of Treezor's features
- Your localization and language selection
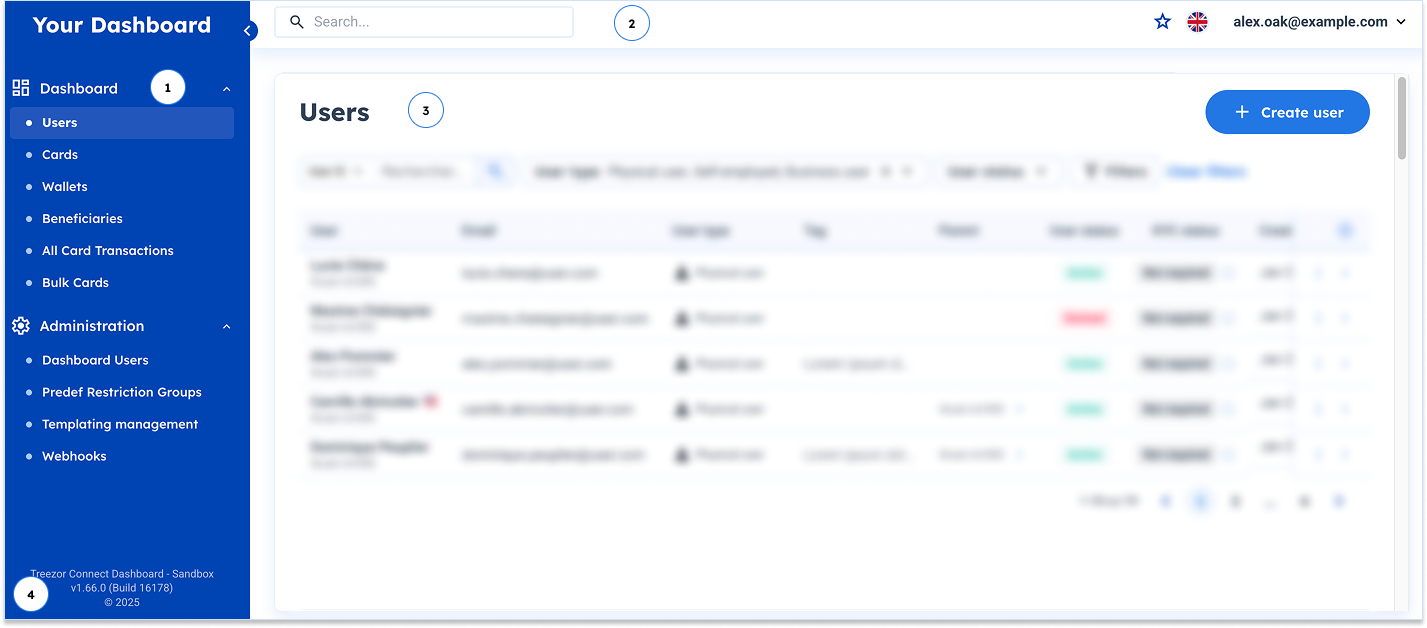
| # | Section | Description |
|---|---|---|
| Navigation menu | Located on the left-hand side, this foldable menu allows you to navigate to the different views:
| |
| Main toolbar | In the upper part of each view, the Main toolbar contains the search field, the list of favorites, the language selection, and the account drop-down, for you to log out or access your Account page. | |
| Main view | Main content, which depends on the selected view. By default, the Users view is displayed. | |
| Environment | In the bottom left corner, you’ll find information about your environment and the version of the Dashboard. |
Predefine card restriction groups
To select the relevant options for the cards that you’ll be creating in the next step, you may create the restriction groups that apply to your use case. This step requires the Administrator user role.
Information – Restrictions are not testable in Sandbox
When emulating card transactions to test your integration, restrictions won’t apply.
In the Administration section of the navigation menu, select the Predefined Restriction Groups view to start creating restrictions.
Merchant ID restrictions
Defining the Merchant ID (MID) restrictions allows you to define if the card should be usable in some specific merchants.
→ In the Merchant Id Groups tab, click on the “Add a new restriction” button to start creating your Merchant Id restriction group.

→ In the displayed popup:
- Define a name and a start date for your restriction group
- Select whether you want to blacklist or whitelist a group of Merchant Ids
- Enter the codes manually or upload a CSV file (the list of values in a single column)
- Click on the “Save” button to validate your creation
MCC restrictions
Defining the merchant category codes (MCC) restrictions allows you to define if the card should be used in only certain categories of merchants (or, to blacklist some categories of merchants).
→ In the MCC Groups tab, click on the “Add a new restriction” button to start creating your MCC restriction group.
→ In the displayed popup:
- Define a name and a start date for your restriction group
- Select whether you want to blacklist or whitelist a group of MCC codes
- Enter the codes manually or upload a CSV file (the list of values in a single column)
- Click on the “Save” button to validate your creation
Country restrictions
Defining specific country restrictions allows you to define if the card should be used in certain countries only (or, to blacklist some countries).
→ In the Country Restrictions tab, click on the “Add a new restriction” button to start creating your Country restriction group.
→ In the displayed popup:
- Define a name and a start date for your restriction group
- Select whether you want to blacklist or whitelist a group of countries
- Enter the codes manually or upload a CSV file (the list of values in a single column)
- Click on the “Save” button to validate your creation
Once all your desired restriction groups have been created, you can move on to the next step.
Create physical cards in bulk
In the Dashboard, you can create several cards at once while automatically generating users that you can edit afterward.
Before you start, ensure that you already have:
- A Card Print reference (as indicated in the prerequisites)
- The Id of your Master Wallet (i.e., the Wallet attached to your company user).
→ Select the Bulk Cards view in the menu, and click on the “Create bulk cards” button to start your bulk card creation.

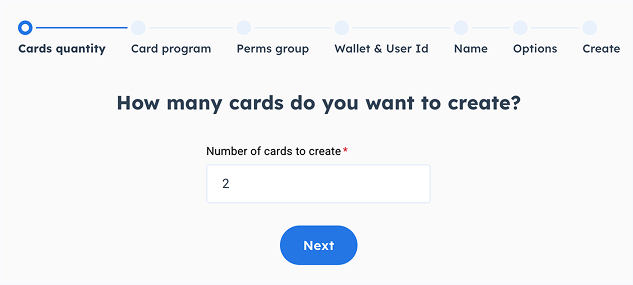
Step 1 – Define the number of cards
Be mindful of the number of cards you enter. Any ordered card will be charged to you. You must create at least 2 cards for the creation to be successful.
If you’ve subscribed to a specific offer with a preset Sandbox and set of cards, you are limited to 15 cards.
→ Enter the number of cards to create and click “next”.
Step 2 – Select your card type
Let's make sure you have both virtual and physical cards. Cards will be displayed as virtual cards converted into physical ones in your user profile.
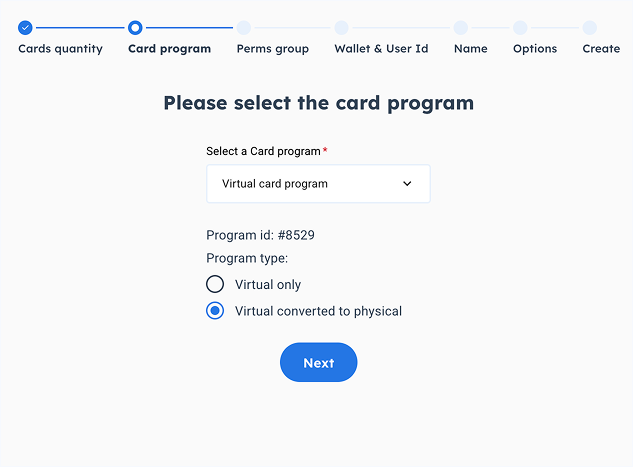
→ Select the Virtual card program in the pick-list and the “Virtual converted to physical” before going to the next step.
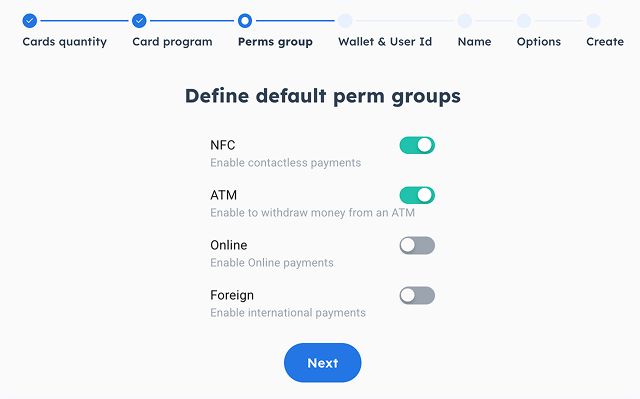
Step 3 – Select your permission groups
Usually, only “NFC” and “online” toggles should be activated for this use case.
→ Switch on the relevant toggle buttons and click “next”.
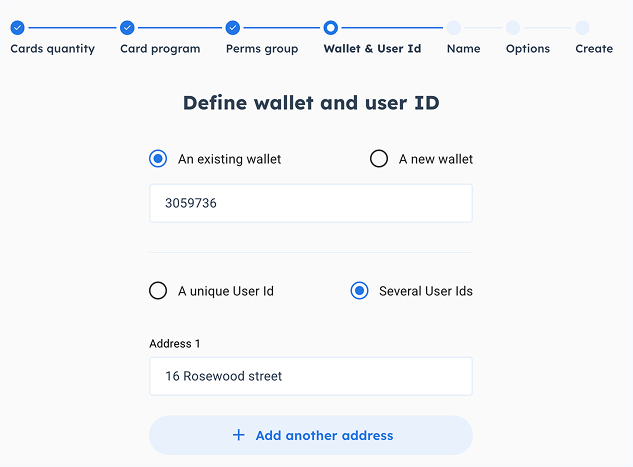
Step 4 – Select the wallet and users for the cards to create
For cards to be created, you need both a wallet and users to link them to.
→ In this case, you need to:
- Select the “An existing wallet” option and enter the Id of your company Wallet (i.e., Master Wallet)
- Select the “Several User Ids” option (new users will be automatically generated)
- Ensure your company address is properly defined for the physical cards to be delivered.
You may need to select a distribution country as well.
Step 5 – Define the name to be displayed on the cards
In this specific case, the cards will have no names displayed on them as the users, as generic users, are automatically created (you will be able to edit user information only after the card creation).
→ Click “next” to continue.
Step 6 – Define your card options
Enter more card design information (optional)
In the top of this page, additional card design fields are available. If provided at the same time as your credentials, you may enter the “Logo Id reference”, the "Batch delivery Id reference" (if you have subscribed to the option), and the “Package Id reference” for your cards.
→ Enter your references in the dedicated fields.
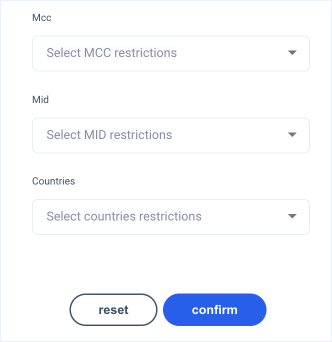
Select restrictions
If you’ve created card restriction groups, you can define what restrictions apply to your set of cards.
→ Click on the arrow icon available next to the “Attach restriction groups” label.

→ In the Select restrictions popup, use the drop-down to select the desired predefined restriction groups and click “confirm”.
Define the limits
The card limits will define the available amount on the gift card. You must set one by default, but you can update this information later.
→ Click on the arrow icon available next to the “Define limits” label.

The prompted popup already displays limits which are the default limits of your card program.
→ In the prompted popup:
- Define a random limit for ATMs (at least one must be entered for the creation to be successful). This will not be taken into account since you deactivated the “Withdrawal” default permission group in Step 3.
- Define a “Global Payment limit” of the desired default amount for your gift cards.
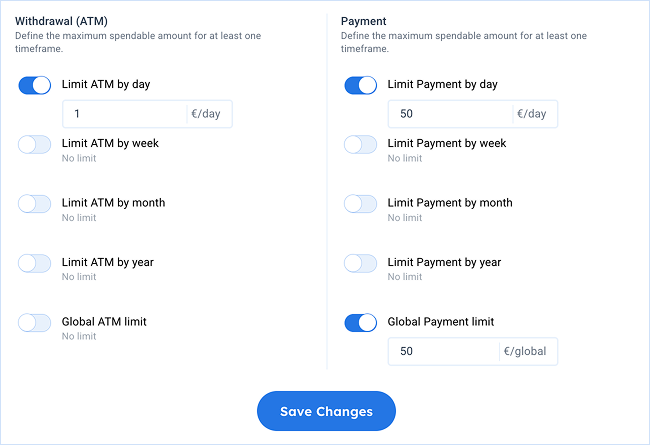
→ Save your changes before going to the next step.

Step 7 – Finalize your card creation
Because you're ordering cards in bulk and you're going to be charged for these cards, you need to make sure everything is as expected.
→ Review the details of the cards to be created before validating your order.
The bulk creation may take a few minutes. You can check the progression in the Bulk Cards view.
Once the order Status is “Complete,” you can go to the next step.

Update the user declarative data
The bulk card creation process created as many users as cards. As a result, you have to edit each one of these users with the necessary declarative data as indicated by Treezor Compliance.
Information – Declarative data to submit depends on the use case
In our use case, users are not KYC-validated, so only the fields indicated in the KYC Form provided by Treezor are to be filled in.
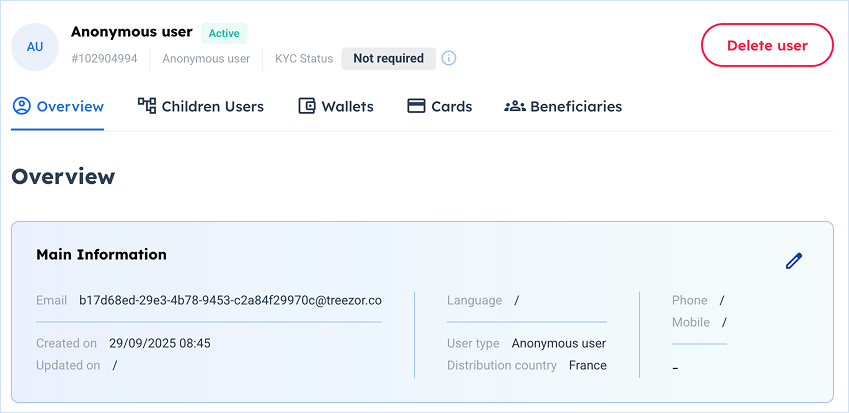
→ In the Users view, the automatically generated users are identifiable as "Anonymous users", with their random email address and the absence of name.
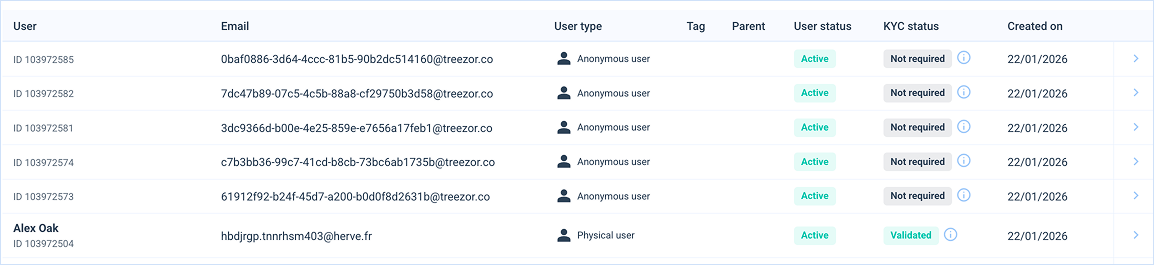
→ Click on an automatically generated user to open the corresponding profile in the User details view.
→ In the Overview tab, Main information section, click on the "Edit" button (pen icon) to access the Edit user popup.
→ In the Edit user popup, enter the required declarative data:
- Main Information section: Email, Last Name, First Name
- Address section
- Birth and Nationality section: Birthday, Birth country, Place of birth, Nationality
- Contact section: Phone number
→ Repeat the operation for as many users as you’ve created.
Once all your users are correctly defined, you can proceed to activate and manage their individual cards.
Activate cards
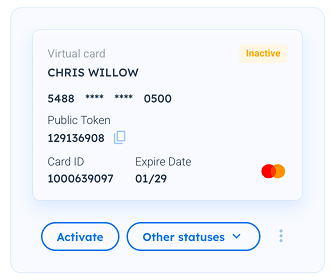
As a security measure, all Cards are issued in an inactive state to ensure that a Physical Card is not usable before the cardholder receives it. Inactive cards can’t be used to make any type of payment or withdrawal.
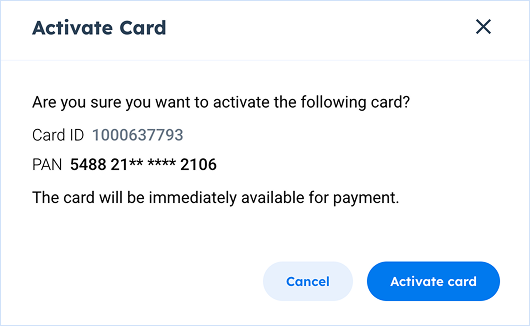
→ In the User details view, select the Cards tab for your user to display the inactive card. Click on the “Activate” button below the card preview.
→ In the prompted confirmation popup, click on the “Activate card” button.
Now that the card is activated, payments can be made, and you can update the card settings as you see fit.
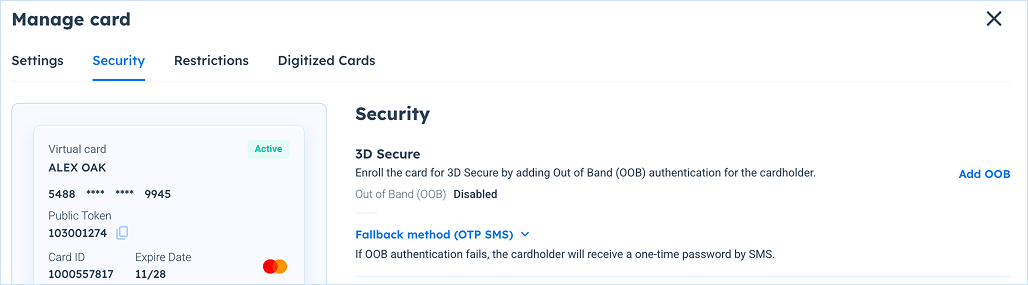
Enroll 3DS
Enrolling the card with the 3DS protocol will ensure the payment isn't declined if strong customer authentication is triggered during an online payment.
→ In the Manage card popup, Security tab, click on the “Add OOB” available in the 3D Secure section to activate Out of Band. This is the primary strong customer authentication of the cardholder through their payment application.
→ Then, activate the OTP SMS option. This is the fallback method, which sends a one-time password (OTP) by SMS.
Manage cards
Update card settings
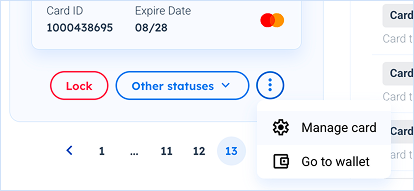
→ In the Cards tab of the User details view, select the “More” button (vertical ellipsis) for the card whose settings are to be updated, and select the “Card settings” option.
The Manage card popup displayed allows you to manage all the card options, including enrolling the card with the 3DS protocol and updating limits and restrictions.
Update card limits
You may want to update the card limits to define the amount available for the gift card.
→ In the Manage card popup, Settings tab, Limits section, set the Global Payment limit with the desired amount.
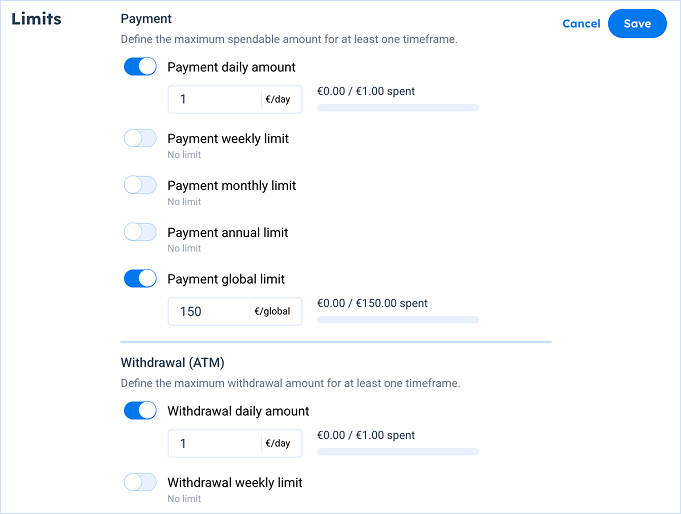
→ Save your changes to apply the new limit.
Update card restrictions
You may update or set MID, MCC, or Country restrictions directly in the Manage card popup.
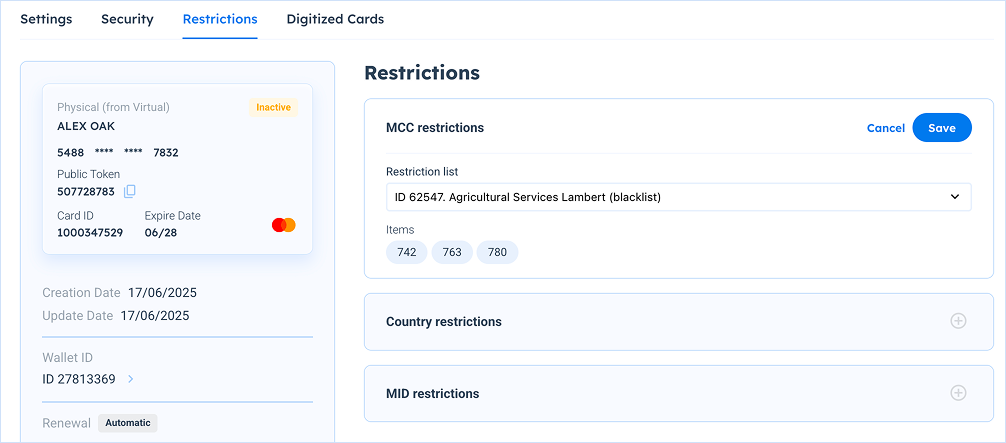
→ To do so, in the Manage card popup, Restrictions tab, select the restrictions group to set on the right-hand side on the view.
→ Select a restriction list in the picklist. Restriction lists are defined by your Administrator.
→ Once the restriction selected, click "Save" to validate your choice.
Handle the end of the gift card life cycle
Once the gift card is used by the end user (Global Payment limit is reached), and if this was a one-time use card, you need to perform the following actions:
Destroy the card
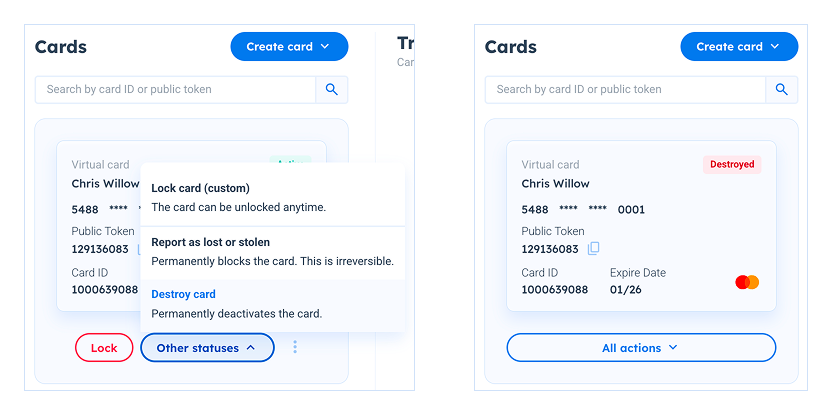
Once the card has been used, you must destroy it. To do so:
→ In the Cards tab, click on the "Other statuses" button and select the "Destroy card" option.
→ Select "Destroy card" in the prompted confirmation popup.
As a result, the card status is changed to destroyed, and is displayed in the card preview.
Deactivate the user
For legal reasons, Users information can't be removed from your Dashboard. They have a permanent "Deleted" status instead.
→ In the User details view, once the user selected, click on the “Delete User” button.

→ In the prompted confirmation popup, click “Yes, delete this user” to continue. As a result, the user is now “Deleted”.


Tip – Recreate a user with the same email
The unique email rule only applies to active users. In other words, once the user canceled, you can create them again using the same email.