Appearance
Cards
The Cards are the payment cards you issue for your end users, either in a virtual or physical form. They can be directly created and managed from your Dashboard.
Accessing Cards
You may access card information by:
- Taking advantage of the main Search field.
- Navigating the Cards view.
- Navigating the User details view, Cards tab once a user is selected.
Search field
The Dashboard main toolbar provides a search field, whose searchable attribute becomes dynamically available depending on what you enter.
Here are the attributes for you to search cards:
- Card ID/Public token – Takes into account the
cardIdor thepublicTokenof the Card. - Embossed name – Takes into account the name displayed on the card (
embossedName).
After validating your search for a given card attribute, the Cards view is displayed, filtered on the corresponding Card for you to select.
Cards view
The Cards view provides the list of all the cards with their key attributes.
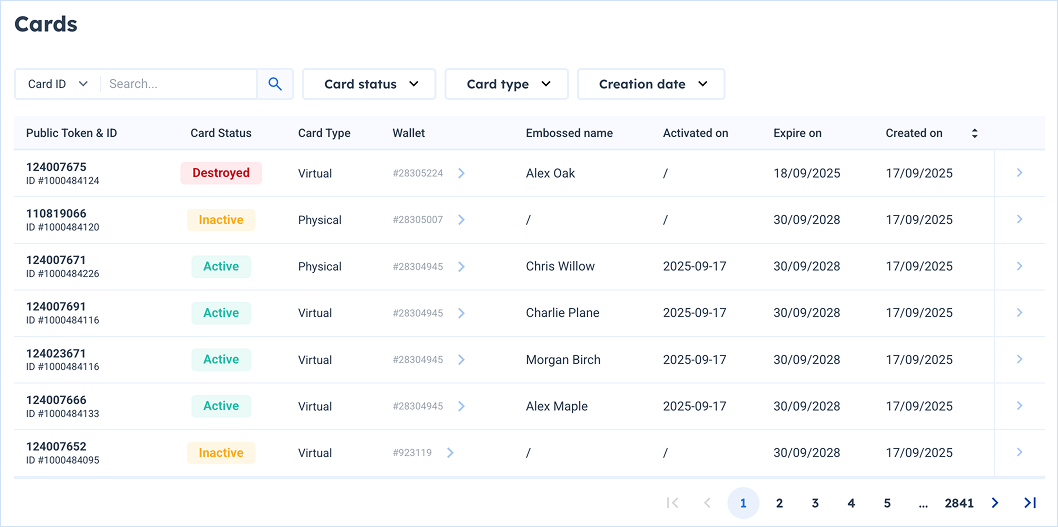
To help you navigate through the list, the following filters are available:
- Card status – Display only cards with the selected status.
- Card type – Display only cards with the selected medium.
- Creation date – Display only cards created on, before, after, or between specific dates.
In addition, the secondary Search field allows you to search cards by cardId, publicToken, or by embossedName.
Clicking on arrow icon for a card switches the view to the corresponding card in the User details view.
User details view, Cards tab
Once you've accessed a User details view, click on the Cards tab to view all the cards attached to the user.
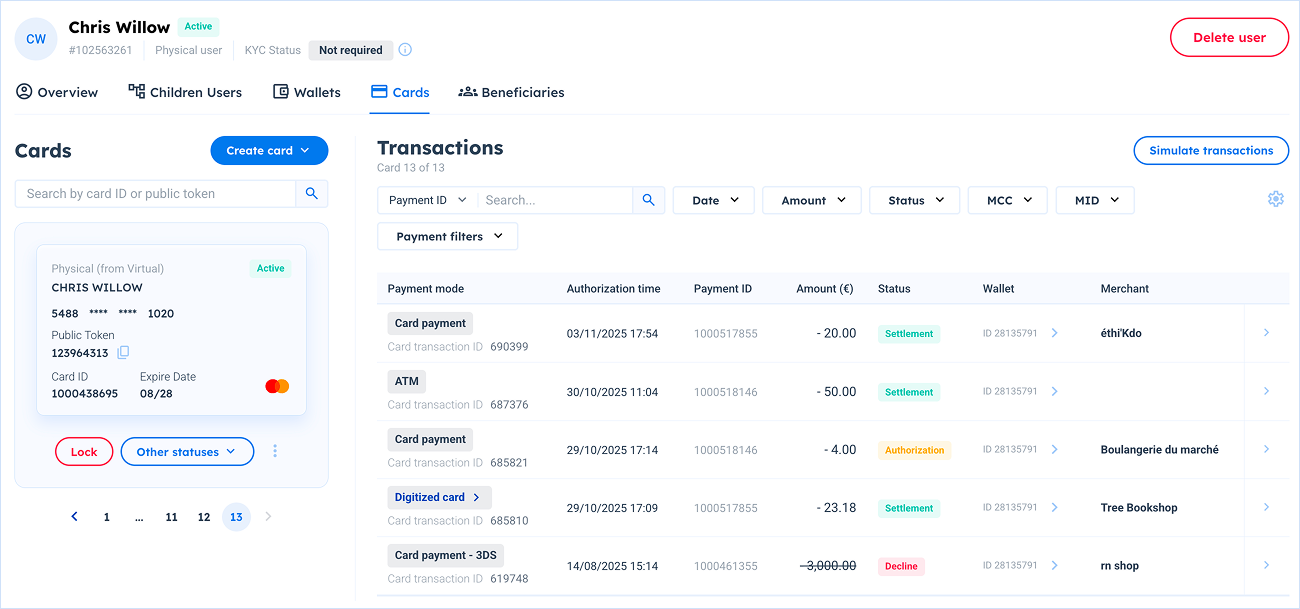
The view is divided into 2 sections:
- Cards – On the left-hand side, you can navigate and manage the user cards.
- Transactions – On the right-hand side, you can view the transactions of the selected card. When the card is not activated yet, this section contains the "Activate" button.
Navigating the Card information
Card preview
In the Cards tab, Cards section, the card preview is displayed. When several cards are available, you can navigate by using the numbers below the card or take advantage of the Search field.
The following card information is available in the preview:
- Card type (whether it is virtual, physical, or converted to physical)
- Card status
- Cardholder's name
- Public token
- Partially masked PAN
- Unique identifier
- Expiration date
The following card statuses can be displayed:
| Status | Description |
|---|---|
| Active | Cards that have been activated. |
| Inactive | Cards that have not been activated yet, or which have been locked or blocked (i.e., exceeded the number of PIN attempts). |
| Blocked | Cards that are either declared as lost or stolen. |
| Expired | Cards that are either past their expiration date or destroyed. |
| Frozen | Cards that have been blocked by Treezor. |
The action buttons below the card preview vary depending on the status of the card:
- Activate the card.
- Lock – Disable the card use on a temporary basis.
- Unlock – Unblock a locked card.
- Other statuses – Provides other options to update the status, including reporting the card as lost or stolen.
The More (ellipsis) button provides additional commands:
| Command | Description | |
|---|---|---|
| Manage card | Opens the Manage card popup. This popup may be read-only if the card is in an inactive status. | |
| Go to wallet | Switches the view to the Wallets tab, with the wallet to which the card is attached displayed. | |
| Reassign card | If available, opens the Reassign Card popup, allowing you to change the cardholder of an inactive card belonging an anonymous user. |
Transactions section
Once a card is selected, the corresponding transactions (if any) are displayed in the right-hand side of the view.
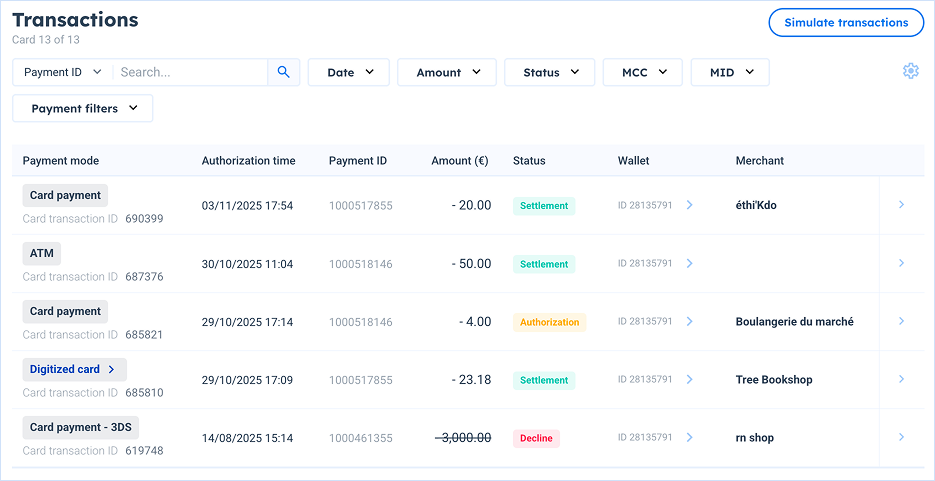
The list of transactions can be sorted, filtered, and customized as you see fit.
| Option | Description |
|---|---|
| Search | Search for transactions based on their Payment ID or Wallet ID. |
| Date | Define the date range for which the transactions are considered. Any transaction whose authorization date is not in the defined time frame is filtered out. |
| Amount | Define the amount range for the transactions to be considered. Any transaction outside the frame is filtered out. |
| Status | Select the transactions to be displayed based on their Status (e.g., Accepted, Declined, etc.) |
| MCC | Enter or select a Merchant Category Code (MCC). Only transactions with this MCC are then displayed. |
| Merchant ID | Enter a Merchant ID. Only transactions with this MID are then displayed. |
| Payment filters | Select which specific payment mode to display. |
| Clear filters | Resets all the sorting and filtering options. Only displayed if at least one filter is selected. |
| Organize columns | Opens a panel for you to select which columns to display and in which order (drag & drop). You may save your changes or reset to the initial display by using the corresponding buttons. Your selection is saved in the local storage for next time. |
In addition, the following elements in the table facilitate the navigation:
- Digitized Card – Opens the Manage card popup, Digitized cards tab.
- Wallet – Switches the view to the Wallets tab with the corresponding wallet selected.
- Transaction details – Clicking on the arrow on the right-most column opens a side panel with the detailed information regarding the card transaction.
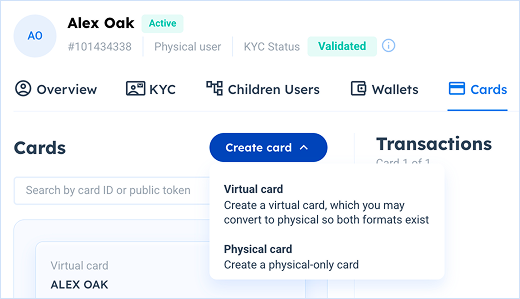
Creating a Card
You can create a new card for a user from the User details view, Cards tab.
Please note:
- You need to create a Wallet beforehand.
- Options to create virtual or physical cards depend on your card program.
The Create card dialog box corresponding to your selection is displayed.

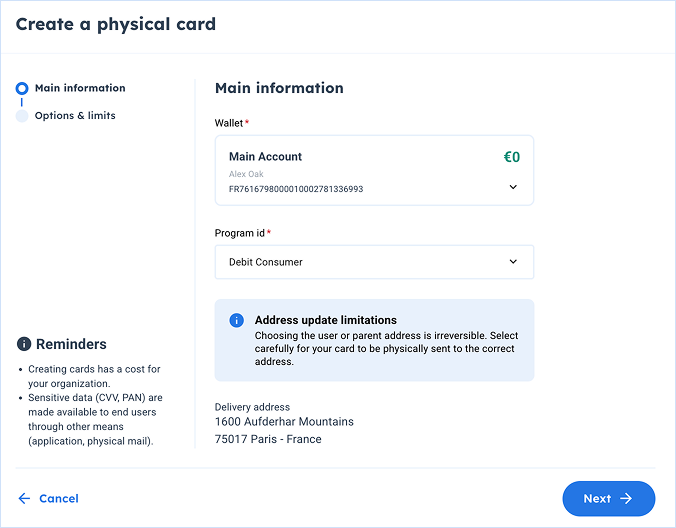
Once you have selected the wallet and the card program, you can click next to proceed.
'%3e%3cpath%20d='M84%2028L82.6%2026.55L86.15%2023H74V21H86.15L82.6%2017.45L84%2016L90%2022L84%2028Z'%20fill='white'/%3e%3c/g%3e%3cdefs%3e%3cclipPath%20id='clip0_4265_13531'%3e%3crect%20width='24'%20height='24'%20fill='white'%20transform='translate(70%2010)'/%3e%3c/clipPath%3e%3c/defs%3e%3c/svg%3e)
In the next step, the default limits and options from your card program are displayed. You can adjust them before creating the card.
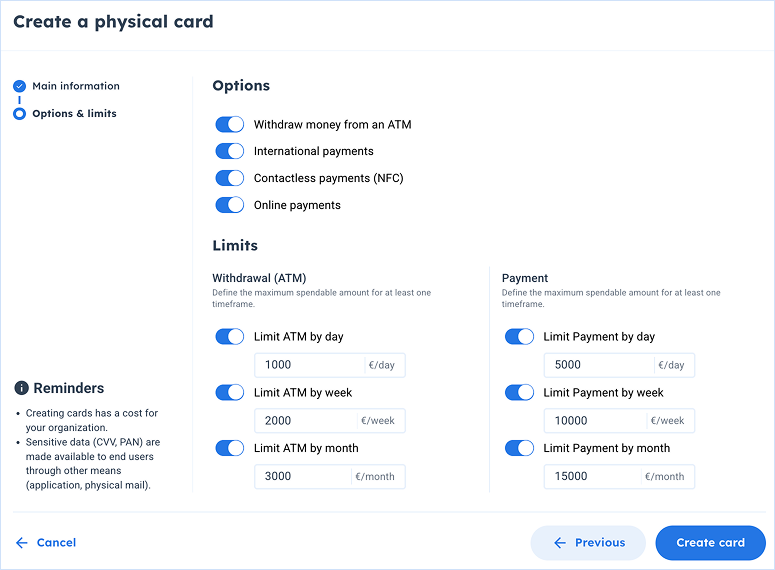
Once this done, you can click on the "Create card" button to complete the creation.
Creating Cards in bulk
You can order Cards in bulk using the Bulk Cards view. At the end of the process, the Cards will be sent to a unique address.
Click on the "Create bulk cards" button in the upper right corner of the view to start the process and follow the steps.

| Step | Description |
|---|---|
| Cards quantity | Indicate the number of cards you wish to create. |
| Card program | Select your card program (cardPrint) and whether to create physical or virtual cards. Options available depend on your card program. |
| Perms group | Define your card options by activating the toggles:
|
| Wallet & User Id | Cards are always attached to a user and a wallet. Define:
|
| Name | Define whether the user name is displayed on the card. This is only possible if you have a unique user ID in the previous step. |
| Options | Define additional options for your card:
|
| Create | Review the bulk card creation to make sure everything is in order before validating the order. |
Once your order complete, you are redirected to the Bulk orders list, in which you can follow the status of the order.
Bulk orders list
The main display of the Bulk Cards view lists all your previous orders, whether they have succeeded or not.
You can track the progress of a Bulk Card creation using the dedicated interface below.

For each bulk creation, key information such as the Order ID and Creation Date are available. Please note that the GPS ID stands for your Card Program card print.
The following commands are available.
| Action | Description | |
|---|---|---|
| View error report | Downloads the error report in the CSV format. | |
| View creation details | Opens the Bulk Card creation details popup. | |
| Download creation details | Downloads the creation details in the CSV format. |
Managing Cards
You have the ability to manage existing cards from the User details view, Cards tab for any selected user. Most options are defined in the Manage card popup, available upon clicking on the "More" button and selecting the "Manage card" option.

You have the ability to:
- Activate the Card
- Enroll the Card for 3D Secure
- Update the Card options and Limits
- Manage Card restrictions (MCC, MID and Country)
- Block the Card – Disable and enable the card use on a temporary basis or declare the card as stolen or lost
- Unblock PIN – Unblock a card locked due to too many PIN attempts
- Unblock CVC – Unblock a card locked due to too many CVC attempts
- Convert to Physical – Create a physical version or a Virtual Card
- Manage Digitized Cards – Suspend, unsuspend, and delete digitized cards.
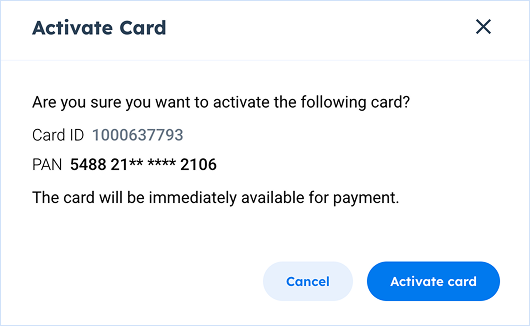
Activate a Card
As a security measure, all Cards are issued in an inactive state to ensure that a Physical Card is not usable before the cardholder receives it. Inactive cards can’t be used to make any type of payment or withdrawal.
Cards must therefore be activated once before they can be used, this can be done using the "Activate" button available below the card preview in the User details view, Cards tab. The following confirmation popup will be displayed for you to activate the card.

Best practice – Enhance user experience with cardholder activation
Cardholders are usually able to activate their Card by themselves using a code (publicToken) printed on their Card and entering it in your App.
Enroll Card for 3DS
3D Secure is a protocol designed to add an additional security layer to online card payments.
Cards must be registered with the following methods to accept secure online payments.
| Method | Description |
|---|---|
| Out of Band (OOB) | The cardholder must go through a strong customer authentication through their payment application. Primary and mandatory form of enrollment. |
| SMS method | The cardholder receives a code on their mobile phone when an authentication is required for the online payment. This code is unique for each payment and needs to be entered on the merchant's website or mobile application when prompted. Mandatory fallback method. |
To enable 3DS, go to the Manage card popup, Security tab, and click on the "Add OOB" button available in the 3D Secure section.
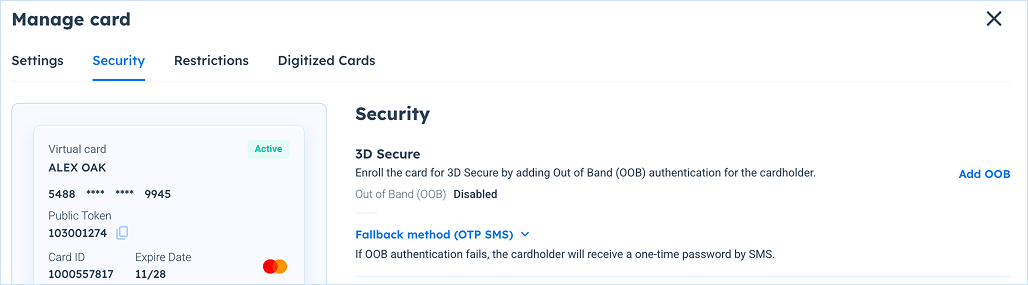
When doing so, the button "Remove OOB" is displayed and the Out of Band (OOB) indicator is set to "Enabled".
It is recommended to activate the Fallback method too. This action is irreversible.

Caution – Users must have a mobile phone number
If they don't, update the User with a mobile phone number.
Update Card options
The card options allow you to define the conditions in which a card can be used.
In the Manage card popup, Settings tab, Options section, the following settings are available for you to update after clicking on the "Edit" (pen) icon:
- ATM – Enables ATM withdrawals
- International – Enables usage outside the cardholder's country
- Contactless (NFC) – Enables contactless payments
- Online – Enables e-commerce payments
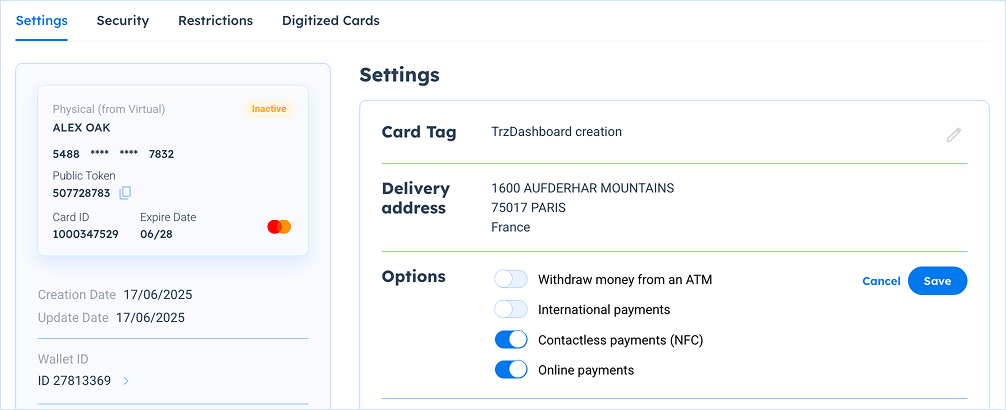
Make sure you click on the "Save" button to validate your modifications.
Update Card limits
You can modify both the Payment limits and Withdrawal (ATM) limits of a Card in the Manage card popup, Settings tab, Limits section by clicking on the "Edit" (pen) icon.
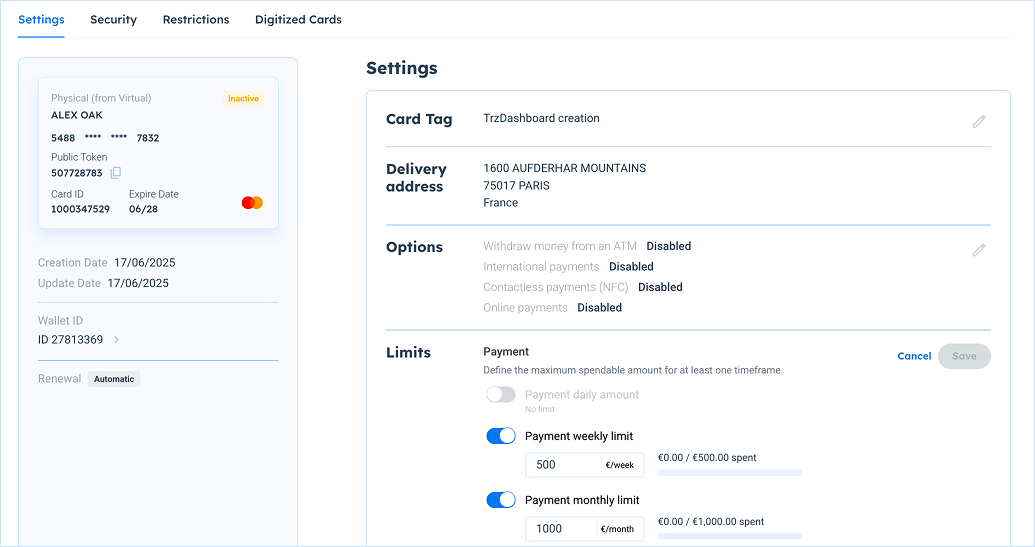

Tip – Rules about limit setting
- Setting a limit value to 0 deactivates the limit.
- For each category, at least one of
Daily,WeeklyorMonthlymust be > 0. - If two limits conflict with each other, the lowest will always be authoritative.
Configurable limits
Below is the list of configurable limits.
| Limit type | Limit | Description |
|---|---|---|
| Withdrawal | Limit ATM by day | Defines the maximum amount the user can withdraw on a sliding day. |
| Withdrawal | Limit ATM by week | Defines the maximum amount the user can withdraw on a sliding week. |
| Withdrawal | Limit ATM by month | Defines the maximum amount the user can withdraw on a sliding month. |
| Withdrawal | Limit ATM by year | Defines the maximum amount the user can withdraw on a sliding year. |
| Withdrawal | Global ATM limit | Defines the overall amount the user can withdraw. |
| Payment | Limit Payment by day | Defines the maximum amount the user can use on a sliding day. |
| Payment | Limit Payment by week | Defines the maximum amount the user can use on a sliding week. |
| Payment | Limit Payment by month | Defines the maximum amount the user can use on a sliding month. |
| Payment | Limit Payment by year | Defines the maximum amount the user can use on a sliding year. |
| Payment | Global Limit Payment | Defines the overall amount the user can pay. |
Make sure you click on the "Save" button to validate your modifications.
Manage Card restrictions
Card restrictions allow you to define in which countries and for which merchants a card may be used. In the Manage card popup, Restrictions tab, you can assign the following types of whitelists and blacklists:
- MCC – Defines the card use for specific Merchant Category Code(s)
- MID – Defines the card use for specific Merchant Id(s)
- Country – Defines the card use for specific Country(ies)

Information – Lists are managed by the Administrator
Dashboard Users with the Administrator role can define whitelists and blacklists for restriction groups in the Predef Restriction Groups view.

Adding a restriction list
In order to apply restrictions (whitelist, or blacklist) to a card, go to the Manage card popup, Restrictions tab, and select a restriction category on the right-hand side of the view.
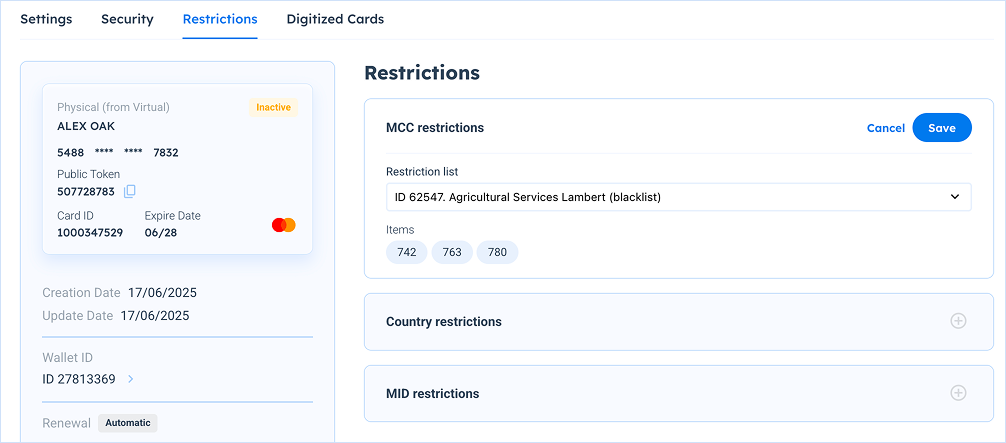
From there, a picklist is available for you to select one of the restriction list created by your Administrator.
Once a specific list selected for a card, you must click on the "Save" button to validate your choice.
Updating restriction lists
When clicking on the "More" (ellipsis) button for a given restriction group, the more commands are available.
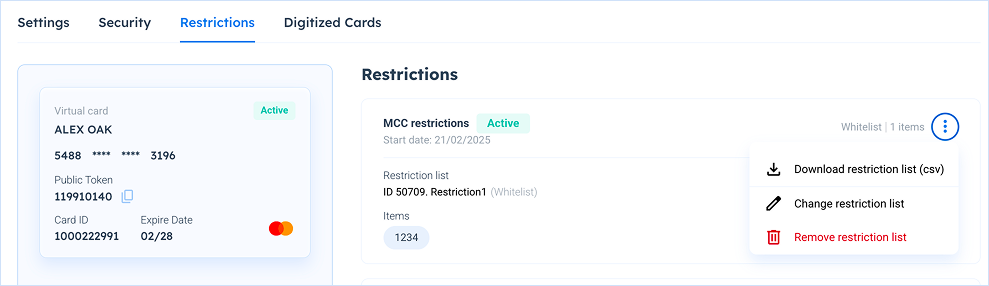
| Command | Description | |
|---|---|---|
| Download restriction list | Download the list in CSV format. | |
| Change restriction list | Select another restriction list to replace the currently assigned one. | |
| Remove restriction list | Remove the list from the card restrictions. The card no longer has a whitelist of blacklist for the corresponding category. |
Block a Card
The Dashboard allows you block a card in case of a security issue; this can be done by using directly the buttons available below the card preview. Options available depends on the current card status:
| Action | Description |
|---|---|
| Lock | Temporarily lock (or custom lock) the card, you may unblock it afterward. |
| Report as lost or stolen | Declare the card as stolen or lost. This action irreversibly blocks the card. |
| Destroy card | Block permanently the card, at the end of the relationship with the end user for instance. This action is irreversible. |
| Unlock | Unlock the card. Only available when the card has been temporarily locked. |
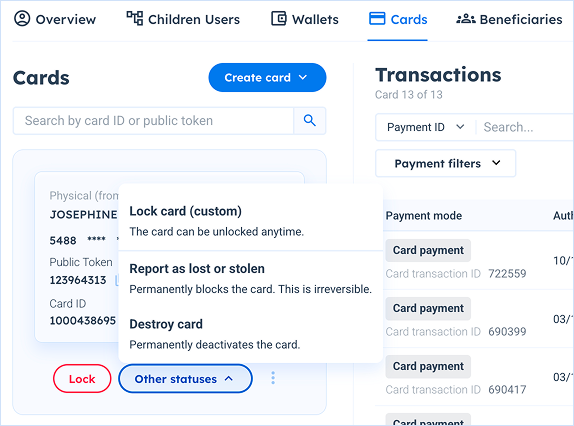
A confirmation popup prompts you to validate the action.
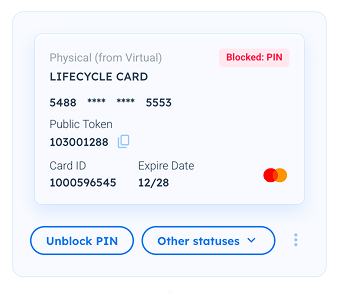
Unblock PIN code
The card can be blocked when the cardholder enters 3 erroneous PIN codes in a row.
You can unblock the card by using directly the "Unblock PIN" button available below the card preview when relevant.
Unblock CVC
The card verification code (CVC) can get locked if the cardholder enters an erroneous CVC multiple times in a row while attempting an online payment.
You can unblock a card CVC in the Manage card popup, Security tab, Unblock CVC section.


Danger – You must verify the cardholder's identity
The card verification code is a security measure, you must make sure the request for unblocking the card comes from the legitimate cardholder.
Convert a Virtual Card to Physical
A Virtual Card can be converted to a Physical one, which will be sent to the cardholder.
To convert a card, go to the Manage card popup and click on the "Convert to Physical Card" button available in the top-right corner of the Settings tab.

A success message is displayed in the top of the screen if the operation succeeds.
Manage Digitized Cards
Treezor offers your Dashboard Users the ability to suspend and delete digitized cards (i.e., cards that are tokenized in a Google Pay, Apple Pay, or Samsung Pay wallet). This way, they can swiftly handle customer requests when it comes to dealing with fraud and lost cards for instance.
To manage digitized cards, go to the Manage card popup, Digitized Cards tab.
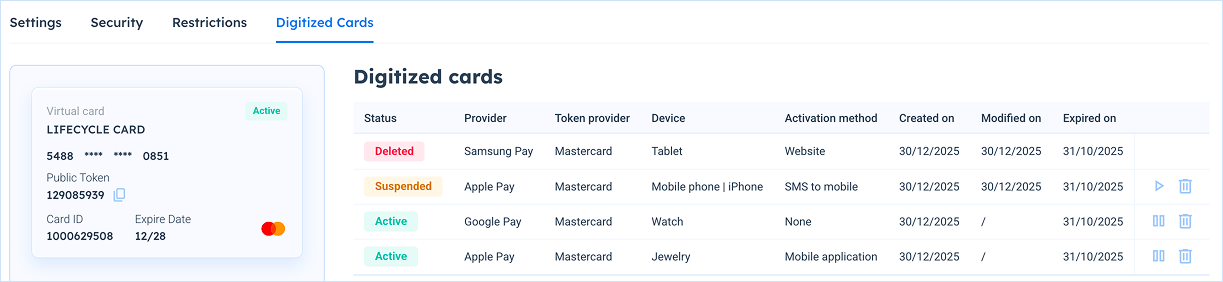
It displays the list of digitized cards for the currently selected card.
Digitized cards may have one of the following statuses:
- Active – The digitized card is active and can be used as a means of payment.
- Suspensed – The digitized card is suspended; it can't be used, but can be reactivated.
- Deactivated – The digitized card is deleted, it can't be used and this status if final.
The following commands are available depending on the digitized card status.
| Action | Description | |
|---|---|---|
| Suspend | Prompts a dialog to suspend the digitized card, with a picklist to select the reason (e.g., device is lost or stolen). | |
| Unsuspend | Prompts a dialog to unsuspend the digitized card, with a picklist to select the reason. | |
| Delete | Prompts a dialog to deactivate the digitized card, with a picklist to select the reason (e.g., device is lost or stolen). This action is irreversible. |